Sierra Engineering Banner
RocketWeb

RocketWebSM Users Manual

pdf version

1. INTRODUCTION

2. REQUIREMENTS FOR ACCESS
  2.a. Form DD2345
  2.b. Registration Form

3. USING THE SITE
  3.a. Communication
  3.b. Personal Homepage
  3.c. Navigation Bar
  3.d. Executing a Run
  3.e. Options Page

  1.   INTRODUCTION

The goal of RocketWebSM is to provide certified users with Internet access to a variety of computer codes for the purpose of analyzing rocket engines and rocket engine propulsion. By making analysis codes available over the Internet, their security, quality, utility, and accessibility can be improved. RocketWebSM provides users with the ability to perform several operations. Users can:

  • Access sample run libraries, reactants' libraries, chemical kinetic mechanisms, and user manuals.
  • Upload their own data and execute runs.
  • Review and/or download both graphic and text results from previous runs.
  • Change and then resubmit previous runs using simple browser editing methods.
  • Have easy and quick accessibility to code experts and authors for help with code use.

Security:

The site meets or exceeds U.S. Government requirements for the transmission of limited distribution data. Communication between the user and the site is protected by the same high level of security. All user data is confidential and protected. No one, including the government, will have access to user runs. All users will be cleared with the Defense Logistics Service Center.

Quality:

In recent years, the Government’s historical practice of being the sole source of funding for the codes has changed. Very little government funding has been available to maintain the Joint Army-Navy-NASA-Air Force (JANNAF) computer codes (like TDK and SPP) which remain the backbone of most rocket propulsion designs. This has created a serious threat of losing the expertise required to maintain and upgrade the programs. To address this problem, this Web site will allot a portion of its income towards code maintenance and improvement. In most cases, the codes will be maintained by the original authors. Thus, these codes will be the highest quality, most up-to-date versions available. The propulsion community as a whole will provide support by subscribing to the Web site, and those who participate in the service will have input regarding future code modifications.

Utility:

Accessing the codes on the Internet will actually make them easier to use. Previously, the codes often had to be ported to the user’s system. The porting often resulted in variations in code performance. Since any computer can be connected to the Internet, there is no need to port the source code to the analyst’s computer, and users can therefore depend on the integrity of their results. In addition, since the codes will be executed on Sierra ENgineering's computers, the users will be able to run analyses without having to own powerful compute engines. They simply need effective links to the Internet. Finally, the Web site will enable users to easily and quickly contract with code experts for consultation on the configuration of runs. A contracted consultant can even complete analyses for the user. This will enable small, non-conventional firms without the resources of the industry giants to have access to experts for consultation.

Return to Top

  1.   REQUIREMENTS FOR ACCESS
    1.   Form DD2345
  • In order to be allowed access to the functioning part of the site, users must have a Military Critical Technical Data Agreement Number. This can be obtained by contacting the Defense Logistics Support Center's Joint Certification Office at https://www.dla.mil/HQ/InformationOperations/Offers/Products/LogisticsApplications/JCP.aspx or call (800) 352-3572 for access information and information on DD form 2245.
  • You need to send a copy of the company’s incorporation papers or business license to obtain approval from the Defense Logistics Support Center's Joint Certification Office. Sierra Engineering will need a copy of the accepted agreement before a user can be provided with access.
  • International users, please contact Sierra Engineering at rocketweb@sierraengineering.com for information on obtaining access.
    1.   Registration Form
  • The Form: Prospective users will also have to fill out a registration form that will be submitted to the system administrator. Upon verification of your Militarily Critical Technical Data Agreement Number, you will be sent a user contract to be signed by both the user and Sierra Engineering. Upon signing and receipt of appropriate payment, users will be assigned a username and password. This identity will be linked to the database and will allow access to the contracted codes, expert consultants, as well as 100 megabytes of disk space.
  • User ID: Upon completion of the registration process (filled out registration form, confirmation of Militarily Critical Technical Data number, signed user contract) users will be assigned a user I.D. and password. Henceforth, whenever you wish to log on to the site, you will have to enter this I.D. and password.

Return to Top

  1.   USING THE SITE
    1. Communication
    2. All communication with RocketWebSM is protected by a 128-bit encryption security system.

    3. Personal Homepage
    4. Once you have signed on and entered your password, you will be sent to your personal homepage on the site, Figure 1. This page posts a chart of all the runs saved on your personal disk space. The chart indicates the code that was used for a run, the status of that run (if it is complete or still processing), a link to the summary files and plots for each run.

      THEManualFig1.gif (29260 bytes)

      Figure 1. The User Homepage (click image to expand image)

      • Code used: This box indicates the analysis program used for the analysis.
      • Status: The status box indicates whether the run is in progress or has finished. Normally, you will be notified through email when a run has finished.
      • Comments: This box contains any comments the user or the user’s consultants made about the run.
      • Options: Clicking on the OPTIONS link will take the user to a new page that allows the user to view the results of a run and manage files in the output directory (Section 3.e).

    5. Navigation Bar
    6. From your personal home page, the screen will consist of two regions. On the left side is the Navigation Bar (Figure 2). The navigation bar contains links that allow the user to return to the user home page from any window, logout from RocketWebSM, log back into RocketWebSM in the event the session has timed out from inactivity, or access this manual. In addition, the list of available codes appears in the drop down menu in the frame on the left side of the screen. Simply choosing the desired code and clicking SELECT will take you to the input page for that code. The code input page has consists of the navigation bar on the left hand side and the input window on the right hand side. Additional code specific buttons, comprising the individual code "Console," will appear on the navigation bar and permit the user to view a brief introduction to and description of the code, sample runs, the code user’s manual, or consult a code expert for assistance. These buttons will change depending on the code being used.
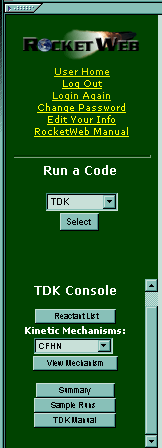
      THEManualFig2.gif (7780 bytes)

        Figure 2. The Navigation Bar

      • Summary: The first choice on the navigation bar is Summary. The Summary page is automatically loaded into the code home page, so you are already looking at it. The Summary basically provides a brief introduction to the code.
      • Sample Runs: You can also choose to view sample test cases of the code. These test cases are based on actual runs of actual engines and components that have been selected by the code authors as representative of proper code usage, (these sample cases are derived from examples taken from the code's User's Manual). When you select this choice, you are linked to a page which shows the data that was input for the test case. This data is presented in the precise format that is required to perform any run with the code. After reviewing this page, you may choose to run the test data (this is not a run that is charged to your account or archived; it exists already in the database memory and so takes up no processing time). The run will produce typical result summary files as well as launch the plotting routines for the resulting data. You can browse through the data and the plots at your leisure to understand how the site functions.
      • Manual: Users will also have access to view and download an online version of the code User's Manual. Selecting the Manual option will link you to a Table of Contents page. From here you can download individual chapters or the whole text. Users the option of downloading by chapters because the size of the text as a whole makes it very cumbersome. Note the distribution limitations displayed with each manual; each manual must be regarded as sensitive material and handled according to the distribution limitations. This manual contains all the information that you will need to produce and format your own data for execution by the code. It also contains in-depth information about the code and its intended use.
      • Review Data: You can also review the input data for past runs in order to modify it as you see fit. If you are not satisfied with your results, you can modify your input data by returning to the Input box and using simple browser editing commands such as Cut and Paste. In addition, RocketWebSM provides special data libraries, such as kinetic mechanisms and reactant libraries, which contain data options that have been pre-formatted to fit the requirements of the code. Thus, if you want to change kinetic mechanisms or reactants, you simply click on the Kinetic Mechanisms button or the Reactants button, highlight and copy the data in which you are interested, then paste it over your data. You can then resubmit your input file for another run (this is treated like a new run).
      • Consult Author: One of the important features of RocketWebSM is its ability to provide access to expert consultants on the use of the codes. In most cases these consultants are the actual code authors. Selecting the Consultation link will start the process of connecting you to the consultant. Once you have contracted with the consultant, you can choose to give the consultant access to your input data so that he or she can modify and make runs for you. (This option is not yet operational.)

    7. Executing A Run
      • Starting: From the User Home Page, the code to be executed can be selected from the drop down menu on the navigator bar on the left side of the screen. Once the code is selected, click on SELECT and the data input window for the chosen code appears.
      • Input Screen: When the input screen for a code appears, a navigation console for the chosen code also appears on the navigation bar. From the console, actions specific to the chosen code can be performed. Figure 3 shows the input window for the TDK program.
      • Input Data File Creation: Input files for the code are created within the window in the input screen. The data can be created from scratch by the user, uploaded from the user computer by cutting or pasting, or by accessing a sample input file from the particular code’s console by cutting and pasting the sample input file into the input window and modifying parameters. For specific definition of the inputs, refer to the manual of the code being used.
      • THEManualFig3.gif (15854 bytes)

        Figure 3. The Code Input Window (click image to expand image)

      • Run Program: To submit the data for a run, simply click on the Run Program button. Run Program actually enters the run into the database without running it. The next screen acknowledges database entry and asks you to run it. After 15 seconds the site updates the window, letting you know the job is running. About 10 seconds later, the site updates the run status by showing the last 10 lines of the output file. Once the run is complete, the entire output file is displayed. You need not stay logged into the site. You can logoff and return later to view the completed output. You will be notified by email when your run has completed.
      • Edit Input: If you are editing the input for a previous run, you can either do your editing locally on your own system or use the text box on the input form as you would use a simple word processor. Use the Options window to edit the input file from a previously executed run.

    8. Options Page
      • Options Window: This page, Figure 4, allows the user to view the results of a run and manage files in the output directory.
      • THEManualFig4.gif (17984 bytes)

        Figure 4. The Options Window (click image to expand image)

      • File Options: Click on the appropriate link to either run the case again or delete the run. By selecting DELETE RUN, you can maintain your space on the disk and free up memory for further runs. The data from the selected run will be deleted from your disk space. Only a record of the run will remain. None of the files will be saved. Remember that you can download any of your data at any time you desire, so that a complete copy of all the files generated by each run can be kept on your local computer. Users will be allotted 100 megabytes of space on the server disk for storing runs and other data. Once that space has been filled, it will be impossible to execute additional runs. Therefore, you are encouraged to perform regular administration of your disk space by deleting older files, thereby making room for new. When a file is deleted by a user, the record of that file and that run will remain in archived form, so that a complete record of your activity will always be extant.
      • Status Information: There are links that will allow you to view data generated by the run. You can view the generated data to look at and/or download results, view an FTP style directory of the files generated by that run. Here you will be able to view and/or download any file in the directory. To do so, simply click on the type of data you are interested in accessing and it will automatically be presented in the browser. To save the file to your disk, use the browser’s File => Save As command, select the appropriate location on your disk to which to save, and the browser will do the rest. Users will also be able to access the parent directory containing all the files stored on their allotted disk space.
      • Plot Options: (available for most codes) Select the plot that you wish to view from the drop down window. Click on VIEW PLOT to view the plot.
      • New Comment: (bottom, middle of screen)  This space allows the user to change the comment that appears for this run on the user home page.
      • Request Help:  You can select an expert to assist in the analysis and/or design of your specific problem.   The expert may complete the runs with your permission.
      • Plots: (coming soon) You can download and view any plots by clicking on the appropriate light bulb. You will be prompted with a choice of available plotting routines for that file. Upon selecting a routine, you will have the option of either saving the plot file to your own system or opening the file and viewing the plot immediately. Opening the file will automatically spawn a window which will contain the plot.

Return to Top